The Best Fluffy Pancakes recipe you will fall in love with. Full of tips and tricks to help you make the best pancakes.
Table of Contents
Introduction
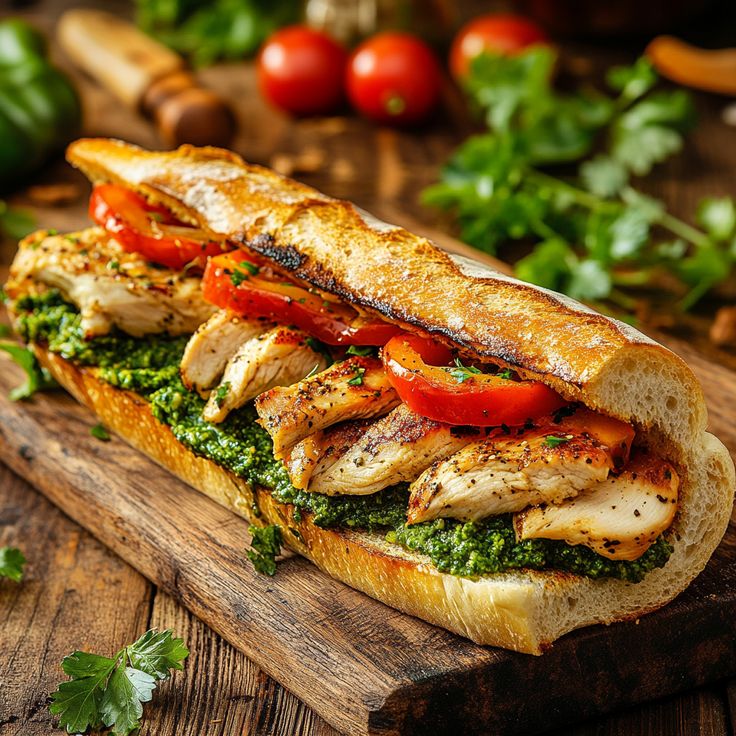
Imagine a grilled chicken sandwich so perfectly crafted that each bite delivers a symphony of textures and flavors: a tender, juicy chicken breast with distinctive smoky grill marks, a creamy and tangy sauce, crisp fresh lettuce, and a soft, toasted bun that holds it all together. Now, imagine enjoying this restaurant-quality sandwich in the comfort of your own home, knowing exactly what went into it—and for a fraction of the price. This isn’t a fantasy; it’s the reality of mastering your own grilled chicken sandwich. I rediscovered the joy of homemade versions after a series of disappointing, dry, and overpriced takeout sandwiches. It inspired me to create a foolproof recipe that guarantees a delicious result every single time. Did you know that Chick-fil-A, a fast-food giant famous for its chicken, didn’t even add a grilled chicken sandwich to its menu until 1989? While our Crispy Buffalo Chicken Wrap is a fantastic low-carb option, this grilled chicken sandwich is the ultimate way to bring the gourmet deli experience to your kitchen. It’s a simple, quick, and family-friendly recipe that will make you forget all about the drive-thru. Get ready to elevate your lunch game!
What is a Grilled Chicken Sandwich?
So, what exactly is a “Grilled Chicken Sandwich”? Is it just a chicken breast slapped on a bun? Well, yes… and no! Think of it as a blank canvas for your culinary creativity. It’s a humble boneless, skinless chicken breast, transformed through a flavorful marinade and the magic of the grill into a smoky, succulent masterpiece. I like to call it the “King of the Backyard Barbecue” because it can easily steal the show from burgers and hot dogs. The name is wonderfully straightforward, telling you exactly what you’re going to get—no mystery here! It’s the kind of satisfying and wholesome dish that proves the old saying, “the way to a person’s heart is through their stomach,” is brilliantly true. A perfectly grilled chicken sandwich, made with your own hands, is a gesture of love that everyone can appreciate. Ready to win some hearts and tantalize some taste buds?
Why You’ll Love This Grilled Chicken Sandwich
You will choose this homemade grilled chicken sandwich over takeout every time, and here’s exactly why. First, the main highlight is the unbeatable Health and Nutrition Benefits. Grilled chicken is a lean source of high-quality protein, essential for repairing tissues and building muscle, and contains beneficial B vitamins and minerals like iron and selenium . By making it at home, you control the ingredients, avoiding the excess sodium, hidden sugars, and unhealthy fats often found in fast-food versions . A homemade grilled chicken sandwich is consistently a healthier choice than most fast-food burgers and fried chicken sandwiches .
Second, crafting this grilled chicken sandwich at home is a massive Win for Your Wallet. For the price of one takeout sandwich from a fast-casual restaurant, you can buy ingredients to make two or even three sandwiches of equal or better quality . It’s a cost-effective way to feed your family a satisfying, gourmet-level meal without the premium markup.
Finally, the Flavor and Customization make it truly special. Your kitchen, your rules! You can marinate the chicken in a zesty lemon-herb blend, a smoky barbecue sauce, or a spicy buffalo marinade. The topping possibilities are endless, from classic lettuce and tomato to avocado, crispy bacon, or a variety of melted cheeses. If you love the ability to tailor a meal to your exact preferences, you’ll also adore our build-your-own Taco Bar recipe. So, fire up the grill and take control of your meal!
How to Make Grilled Chicken Sandwich
Quick Overview
This dish is the perfect combination of incredibly easy, deeply satisfying, and wonderfully flavorful. The standout feature is the juicy, herb-marinated chicken cooked to perfection on the grill. With just 15 minutes of hands-on prep and 10 minutes of cooking, you’ll have a healthier, tastier alternative to takeout that will have everyone asking for seconds.
Key Ingredients for Grilled Chicken Sandwich
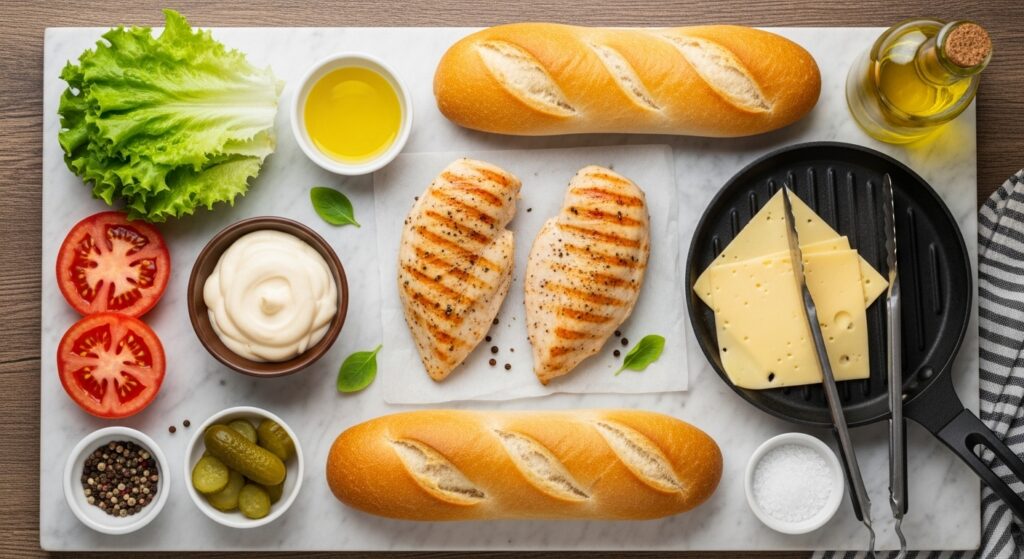
For the Chicken and Marinade:
- 2 boneless, skinless chicken breasts (about 1 lb total), sliced in half horizontally to create 4 thin cutlets
- ¼ cup olive oil
- ¼ cup lemon juice
- 2 cloves garlic, minced
- 1 tsp dried thyme
- 1 tsp dried oregano
- 1 ¼ tsp kosher salt
- ½ tsp black pepper
For the Sandwiches:
- 4 ciabatta rolls or brioche buns, lightly toasted
- 4 slices provolone or cheddar cheese
- 4 leaves green leaf lettuce
- 1 large tomato, sliced
- 8 slices cooked bacon (optional)
- ¼ cup mayonnaise
- 1 tsp pickle juice (for seasoned mayo, optional)
Step-by-Step Instructions
- Prepare the Chicken: Place the chicken cutlets between two pieces of plastic wrap and gently pound them to an even ½-inch thickness. This ensures they cook quickly and evenly without drying out .
- Make the Marinade: In a large bowl or resealable plastic bag, whisk together the olive oil, lemon juice, minced garlic, thyme, oregano, salt, and pepper .
- Marinate: Add the chicken cutlets to the marinade, ensuring they are fully coated. Seal the bag and refrigerate for at least 30 minutes, or up to 2 hours for maximum flavor .
- Grill the Chicken: Preheat your grill to medium-high heat (about 425-450°F). Oil the grates to prevent sticking. Grill the chicken for 2-3 minutes per side, or until the internal temperature reaches 165°F .
- Add Cheese: During the last minute of grilling, place a slice of cheese on each chicken cutlet and close the grill lid to allow it to melt .
- Rest the Chicken: Transfer the grilled chicken to a plate and let it rest for 5-10 minutes. This allows the juices to redistribute, guaranteeing a moist bite .
- Assemble the Sandwiches: Spread mayonnaise on the toasted buns. On the bottom bun, layer lettuce, tomato, and bacon (if using). Place the juicy, cheese-topped chicken cutlet on top, crown with the top bun, and serve immediately.
What to Serve With Grilled Chicken Sandwich
This versatile sandwich pairs beautifully with a variety of sides! For a classic cookout meal, serve it with Crispy Oven-Baked Sweet Potato Fries or a Creamy Coleslaw. For a lighter, fresh option, a Berry and Arugula Salad or a Chilled Pasta Salad are perfect complements. If you’re enjoying the sandwich for dinner, a cup of Tomato Basil Soup makes for the ultimate cozy combination.
Top Tips for Perfecting Your Sandwich
- Don’t Skip the Pound: Pounding the chicken to an even thickness is the single most important step to prevent dry, overcooked edges and a raw center.
- Preheat Your Grill: A properly preheated grill is essential for getting those beautiful sear marks and locking in the juices .
- Use a Thermometer: The most reliable way to know if chicken is done is to use a meat thermometer. Pull it off the grill at 165°F for perfectly safe, juicy meat .
- Toast the Buns: Toasting the bun, especially in a little butter or even bacon grease, adds a fantastic texture and flavor that elevates the entire sandwich .
- Customize Your Sauce: Mix a teaspoon of pickle juice into your mayonnaise for a tangy, “secret sauce” that cuts through the richness of the chicken .
Storing and Reheating Tips
Storing: Store leftover grilled chicken (without toppings) in an airtight container in the refrigerator for up to 3-4 days . Store any leftover toppings separately.
Reheating: The best way to reheat chicken without drying it out is in the oven. Place it in a baking dish with a splash of water or broth, cover tightly with foil, and warm at 350°F until it reaches 165°F internally . For a single portion, you can reheat it gently in a skillet with a splash of liquid, covered, over medium-low heat. Avoid the microwave if possible, as it can make the rubbery .
Freezing: You can freeze the cooked, cooled chicken for up to 3 months. Thaw overnight in the refrigerator before reheating using the methods above .


[…] transform simple wings into extraordinary creations. This is the magic of mastering your ultimate chicken wings recipe! I discovered the power of homemade sauces during a game day crisis when my usual buffalo sauce […]