The Best Fluffy Pancakes recipe you will fall in love with. Full of tips and tricks to help you make the best pancakes.
Table of Contents
Introduction
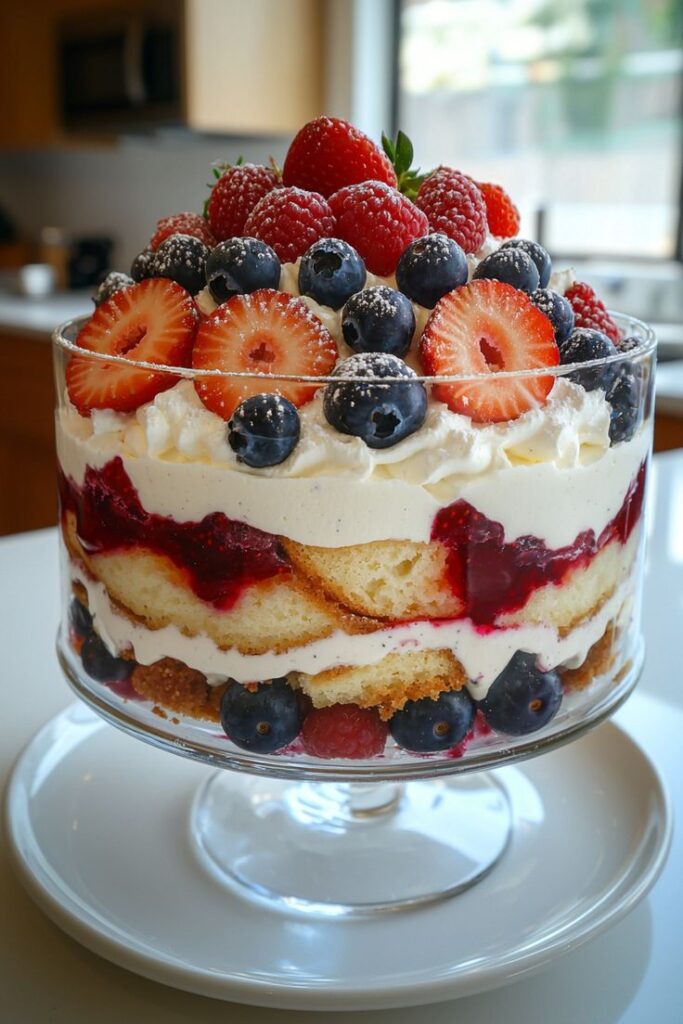
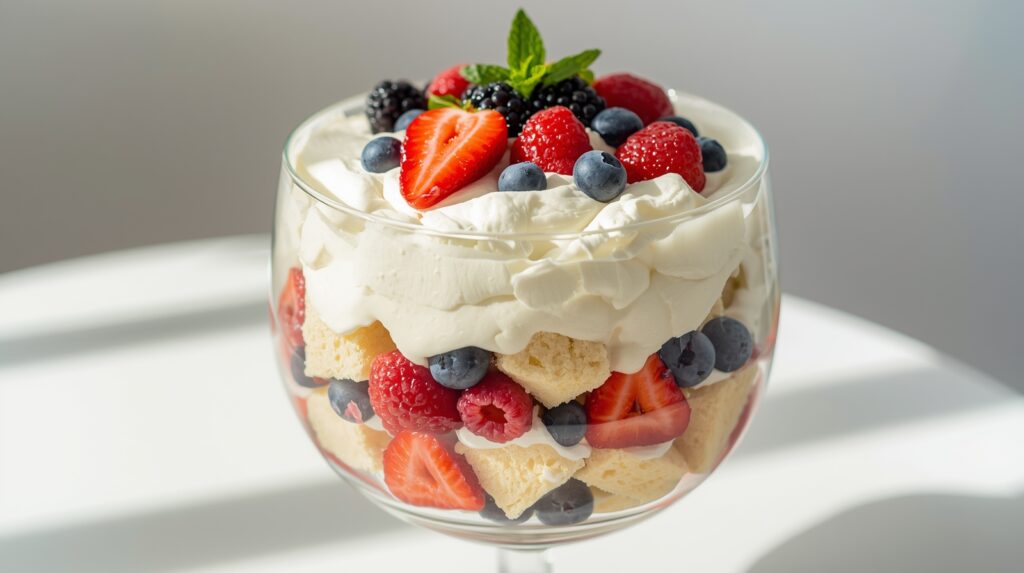
There’s something truly magical about a Berry Trifle. It’s a dessert that is as breathtakingly beautiful as it is deliciously satisfying. Imagine layers of soft, cakey goodness, luscious, creamy custard, and bright, juicy fresh berries all combining in one glorious spoonful. This dessert isn’t just a treat; it’s a centerpiece, a conversation starter, and a guaranteed showstopper at any gathering. The best part? Its stunning appearance belies its incredible simplicity. The trifle has been a beloved dessert in England since the 18th century, designed as a clever way to use up leftover cake and fruit. What makes this recipe so special for you is that it requires absolutely no baking if you don’t want it to, and it’s completely forgiving. Unlike our more precise Layered Chocolate Mousse Cake, this berry trifle recipe is all about assembly and creativity, making it a fantastic, family-friendly project that comes together in just 30 minutes. So, grab your prettiest trifle bowl and get ready to build a dessert that will have everyone reaching for their phones to take a picture before they take a bite!
What is a Berry Trifle?
So, what’s the deal with this thing called a “trifle”? Is it a cake? A pudding? A fruit salad that decided to get fancy? Well, my friend, it’s a magnificent hybrid of all three! This iconic dessert is the ultimate no-bake showstopper, a glorious construction of layers that creates a symphony of textures and flavors in every single spoonful. But why is it called a “trifle”? The name actually comes from an old French word, trufle, which means “whimsical” or “of little consequence”—a nod to its light, delightful nature. There’s a classic saying that ‘the way to a person’s heart is through their stomach,’ and a stunning, glass-bowl view of this beautiful berry trifle is a direct route to success. It’s a dessert that makes everyone feel special. Ready to build some whimsical joy?
Why You’ll Love This Berry Trifle Recipe
You’re going to be completely smitten with this recipe, and here’s why. First, the absolute highlight is the breathtaking visual appeal. The beautiful, distinct layers of red, white, and gold create a stunning rainbow in a bowl that is guaranteed to draw “oohs” and “aahs” from your guests. It’s a dessert you serve with immense pride.
Second, let’s talk about the fantastic cost-saving benefit. Creating a large, impressive trifle at home is significantly cheaper than buying a similar dessert from a bakery or ordering individual desserts at a restaurant. A single trifle can feed a crowd, making it an incredibly economical choice for parties, potlucks, or holiday celebrations.
Finally, the foolproof and flexible nature is what makes it truly special. This is a “no-fail” dessert. There’s no delicate baking involved, and the “layers” can hide a multitude of sins (like a cake that broke apart!). You can easily adapt it to be gluten-free or use different fruits based on what’s in season. If you enjoy the simple, layered approach of our No-Bake Cheesecake Jars, you’ll adore how this berry trifle recipe offers a similar ease but with even more dramatic, crowd-feeding potential. So, grab your spatula and get ready to fall in love with your new favorite dessert!
How to Make Berry Trifle Recipe
Quick Overview
Creating this stunning berry trifle is an easy, fun, and satisfying process. This recipe is a straightforward assembly job that involves preparing (or purchasing) a few simple components and layering them artfully in a clear bowl. The key is the beautiful contrast between the soft cake, smooth creamy layers, and the fresh, vibrant fruit. From start to finish, you can have this dessert ready to serve or chill in just 30 minutes of active prep.
Key Ingredients for Berry Trifle Recipe
For the Cake Layer:
- 1 prepared pound cake (about 12 oz), store-bought or homemade, cut into 1-inch cubes
- ¼ cup berry juice or sherry (optional, for brushing)
For the Berry Layer:
- 4 cups mixed fresh berries (such as strawberries, blueberries, raspberries, blackberries)
- 2 tablespoons granulated sugar
- 1 tablespoon lemon juice
For the Creamy Custard Layer:
- 2 (3.4 oz) packages instant vanilla pudding mix
- 3 cups cold whole milk
- 1 teaspoon vanilla extract
For the Whipped Cream Layer:
- 2 cups heavy whipping cream
- ¼ cup powdered sugar
- 1 teaspoon vanilla extract
For Garnish:
- Extra whole berries and fresh mint leaves
Step-by-Step Instructions:
- Prepare the Berries: Start by washing and drying all your berries. Hull and slice the strawberries. In a medium bowl, gently toss all the berries with the 2 tablespoons of sugar and lemon juice. Let them sit for 10-15 minutes. This macerates the fruit, drawing out its natural juices to create a delicious syrup that will soak into the cake.
- Make the Pudding Layer: In a large bowl, whisk the instant vanilla pudding mix with the 3 cups of cold milk and 1 teaspoon of vanilla extract for 2 minutes until it begins to thicken. Place it in the refrigerator to set further while you prepare the other components.
- Whip the Cream: In a separate chilled bowl, beat the heavy whipping cream, powdered sugar, and 1 teaspoon of vanilla extract with an electric mixer on medium-high speed until stiff peaks form. Be careful not to over-whip.
- Assemble the First Set of Layers: Now for the fun part! Grab your trifle bowl (a clear glass bowl with a 3-4 quart capacity is perfect). Spread one-third of the cake cubes in an even layer at the bottom of the bowl. If using, lightly brush the cake with a bit of berry juice or sherry.
- Continue Layering: Spoon one-third of the macerated berries and their juices over the cake layer. Next, spread one-third of the set vanilla pudding over the berries. Finally, dollop and spread one-third of the whipped cream over the pudding.
- Repeat the Layers: Repeat the layering process two more times: cake, berries, pudding, and whipped cream. You should end with a beautiful top layer of whipped cream.
- Garnish and Chill: Decorate the top of the trifle with your reserved whole berries and fresh mint leaves. For the best flavor, cover and refrigerate the trifle for at least 4 hours, or preferably overnight. This chilling time allows the flavors to meld beautifully and the cake to soften into a lovely, moist texture.
What to Serve With Berry Trifle Recipe
While this trifle is a star on its own, it pairs beautifully with a few complementary elements. For an elegant dinner party, serve it with a glass of dessert wine like a Moscato d’Asti or a late-harvest Riesling, whose sweetness echoes the fruit. A cup of strong coffee or Earl Grey tea also provides a wonderful bitter contrast to the sweet, creamy dessert. Since the trifle is already a complete package, you don’t need to serve it with another dessert, but a small, buttery shortbread cookie on the side can add a nice textural crunch.
Top Tips for Perfecting Berry Trifle Recipe
- Dry Your Berries: After washing your berries, pat them thoroughly dry with a paper towel. Excess water can make your trifle runny.
- The Cake is Key: While pound cake is classic, you can use angel food cake, sponge cake, or even brownies for a different twist. Stale cake actually works better than fresh, as it soaks up the juices without becoming mushy too quickly.
- Stabilize Your Whipped Cream: For a trifle that needs to sit out for a while, stabilize your whipped cream. After soft peaks form, add a tablespoon of instant pudding powder and whip until stiff. This will help it hold its shape for days.
- Customize Your Layers: Don’t be afraid to get creative! Add a layer of lemon curd between the berries and pudding, or sprinkle some toasted slivered almonds or crushed amaretti cookies for a crunchy element.
- Use a Piping Bag for a Neat Finish: For the most professional-looking top layer, transfer your final portion of whipped cream to a piping bag fitted with a large star tip. Pipe swirls or rosettes around the edge before adding the berry garnish.
Storing and Reheating Tips
Storing: The great news is that trifles are meant to be made ahead! Cover the trifle bowl tightly with plastic wrap and store it in the refrigerator. It will stay fresh and delicious for up to 3 days. The flavors will continue to meld and improve.
Freezing: We do not recommend freezing a fully assembled trifle. The creamy layers and fresh berries will not thaw well, becoming watery and losing their texture.
Making Components Ahead:
- The cake can be baked or bought up to 2 days in advance.
- The berries can be macerated and stored in the fridge for up to a day.
- The pudding can be made and kept covered in the fridge.
- For the absolute best texture, assemble the trifle no more than 24 hours before you plan to serve it.